Introduction
Welcome to ukoOS, a small operating system for RISC-V. The code can be found on GitHub.
UMN Kernel Object
The operating system is meant to be educational for the UMN Kernel Object club, so there are tutorials describing how to develop on it.
Kernel documentation
In addition to tutorials, the kernel itself is documented.
Linux Setup Guide
Install Visual Studio Code if you do not have it already. Note that you will need to follow the instructions for your Linux distribution
Install these packages:
- git
- podman-docker
If you are using Debian/Ubuntu:
sudo apt install git podman-docker
If you are using Fedora:
sudo dnf install git podman-docker
If you are using Arch:
sudo pacman -S git podman-docker
If you are using a distribution not listed here, install with your distribution's package manager.
Open Visual Studio Code, and navigate to the Extensions menu located at the bottom of the left hand side bar. Install the Dev Containers extension.
git clone ukoOS (git clone https://github.com/UMN-Kernel-Object/ukoos), open the folder in Visual Studio Code (File -> Open Folder).
It should prompt you to reopen in Dev Container. If not, press Ctrl + Shift + P and type Reopen in Dev Container.
You are now in the ukoOS Dev Container.
To verify this, run the below command and verify the line NAME="Alpine Linux" is present.
cat /etc/os-release
When you have a change ready to be committed, you must sign off your commits.
How to sign off and commit changes (in VSCode):
Go to the "Source Control" tab in VSCode, and in the message box, write a description of what you've done.
Press the 3 dots icon shown below, go down to the commit menu, and select "Commit (Signed Off)."
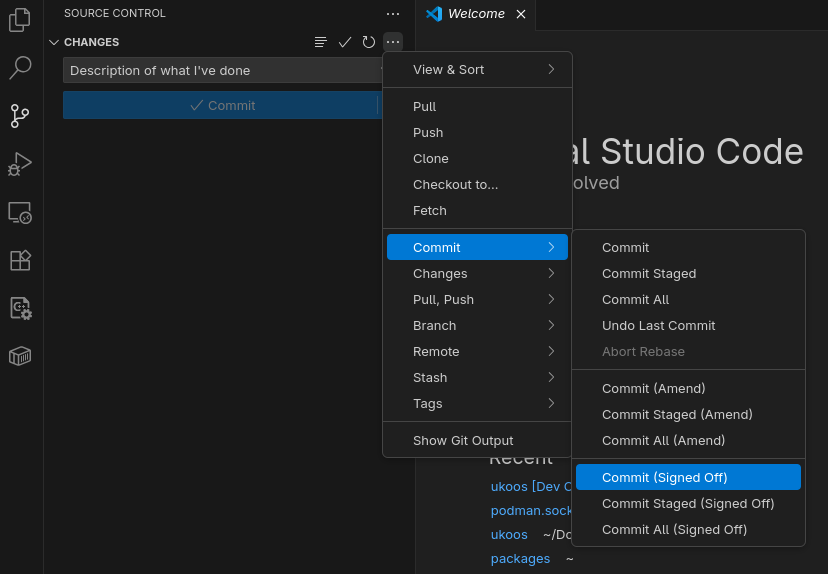
When the pop-up "Would you like to stage all your changes and commit them directly" pops up, click yes. To push the changes, click "Sync Changes."
How to sign off and commit changes (in the CLI):
Your commits should look something like this:
git commit -s -m 'description of what you've done'
macOS Setup Guide
Install Docker Desktop. Download it, run the installer, and follow any installation prompts.
Install Visual Studio Code.
Open Visual Studio Code, and navigate to the Extensions menu located at the bottom of the left hand side bar. Install the Dev Containers extension.
Install git if you do not have it already.
You can install it using Homebrew (brew install git), or download it from their website.
git clone ukoOS (git clone https://github.com/UMN-Kernel-Object/ukoos), open the folder in Visual Studio Code (File -> Open Folder).
It should prompt you to reopen in Dev Container. If not, press Cmd + Shift + P and type Reopen in Dev Container.
You are now in the ukoOS Dev Container.
To verify this, run the below command and verify the line NAME="Alpine Linux" is present.
cat /etc/os-release
How to sign off and commit changes (in VSCode):
Go to the "Source Control" tab in VSCode, and in the message box, write a description of what you've done.
Press the 3 dots icon shown below, go down to the commit menu, and select "Commit (Signed Off)."
When the pop-up "Would you like to stage all your changes and commit them directly" pops up, click yes. To push the changes, click "Sync Changes."
How to sign off and commit changes (in the CLI):
Your commits should look something like this:
git commit -s -m 'description of what you've done'
Windows 11 Setup Guide
Note that doing this on Windows 11 requires more setup, and is more prone to errors then macOS and Linux. If you can, we recommend using macOS or Linux
We need to first install everything needed for running our environment.
First, install WSL.
You need to verify Hardware Virtualization is enabled (note all pre-installed Windows 11 computers should come with Virtualization enabled).
Go to this link to learn how to enable Hardware Virtualization.
Once that is enabled, open a PowerShell window and run the following command:
wsl --install
Install git if you do not have it already.
You can install it using Winget (winget install --id=Git.Git -e), or downloading from their website.
Install Docker Desktop. Download it, run the installer and follow any installation prompts.
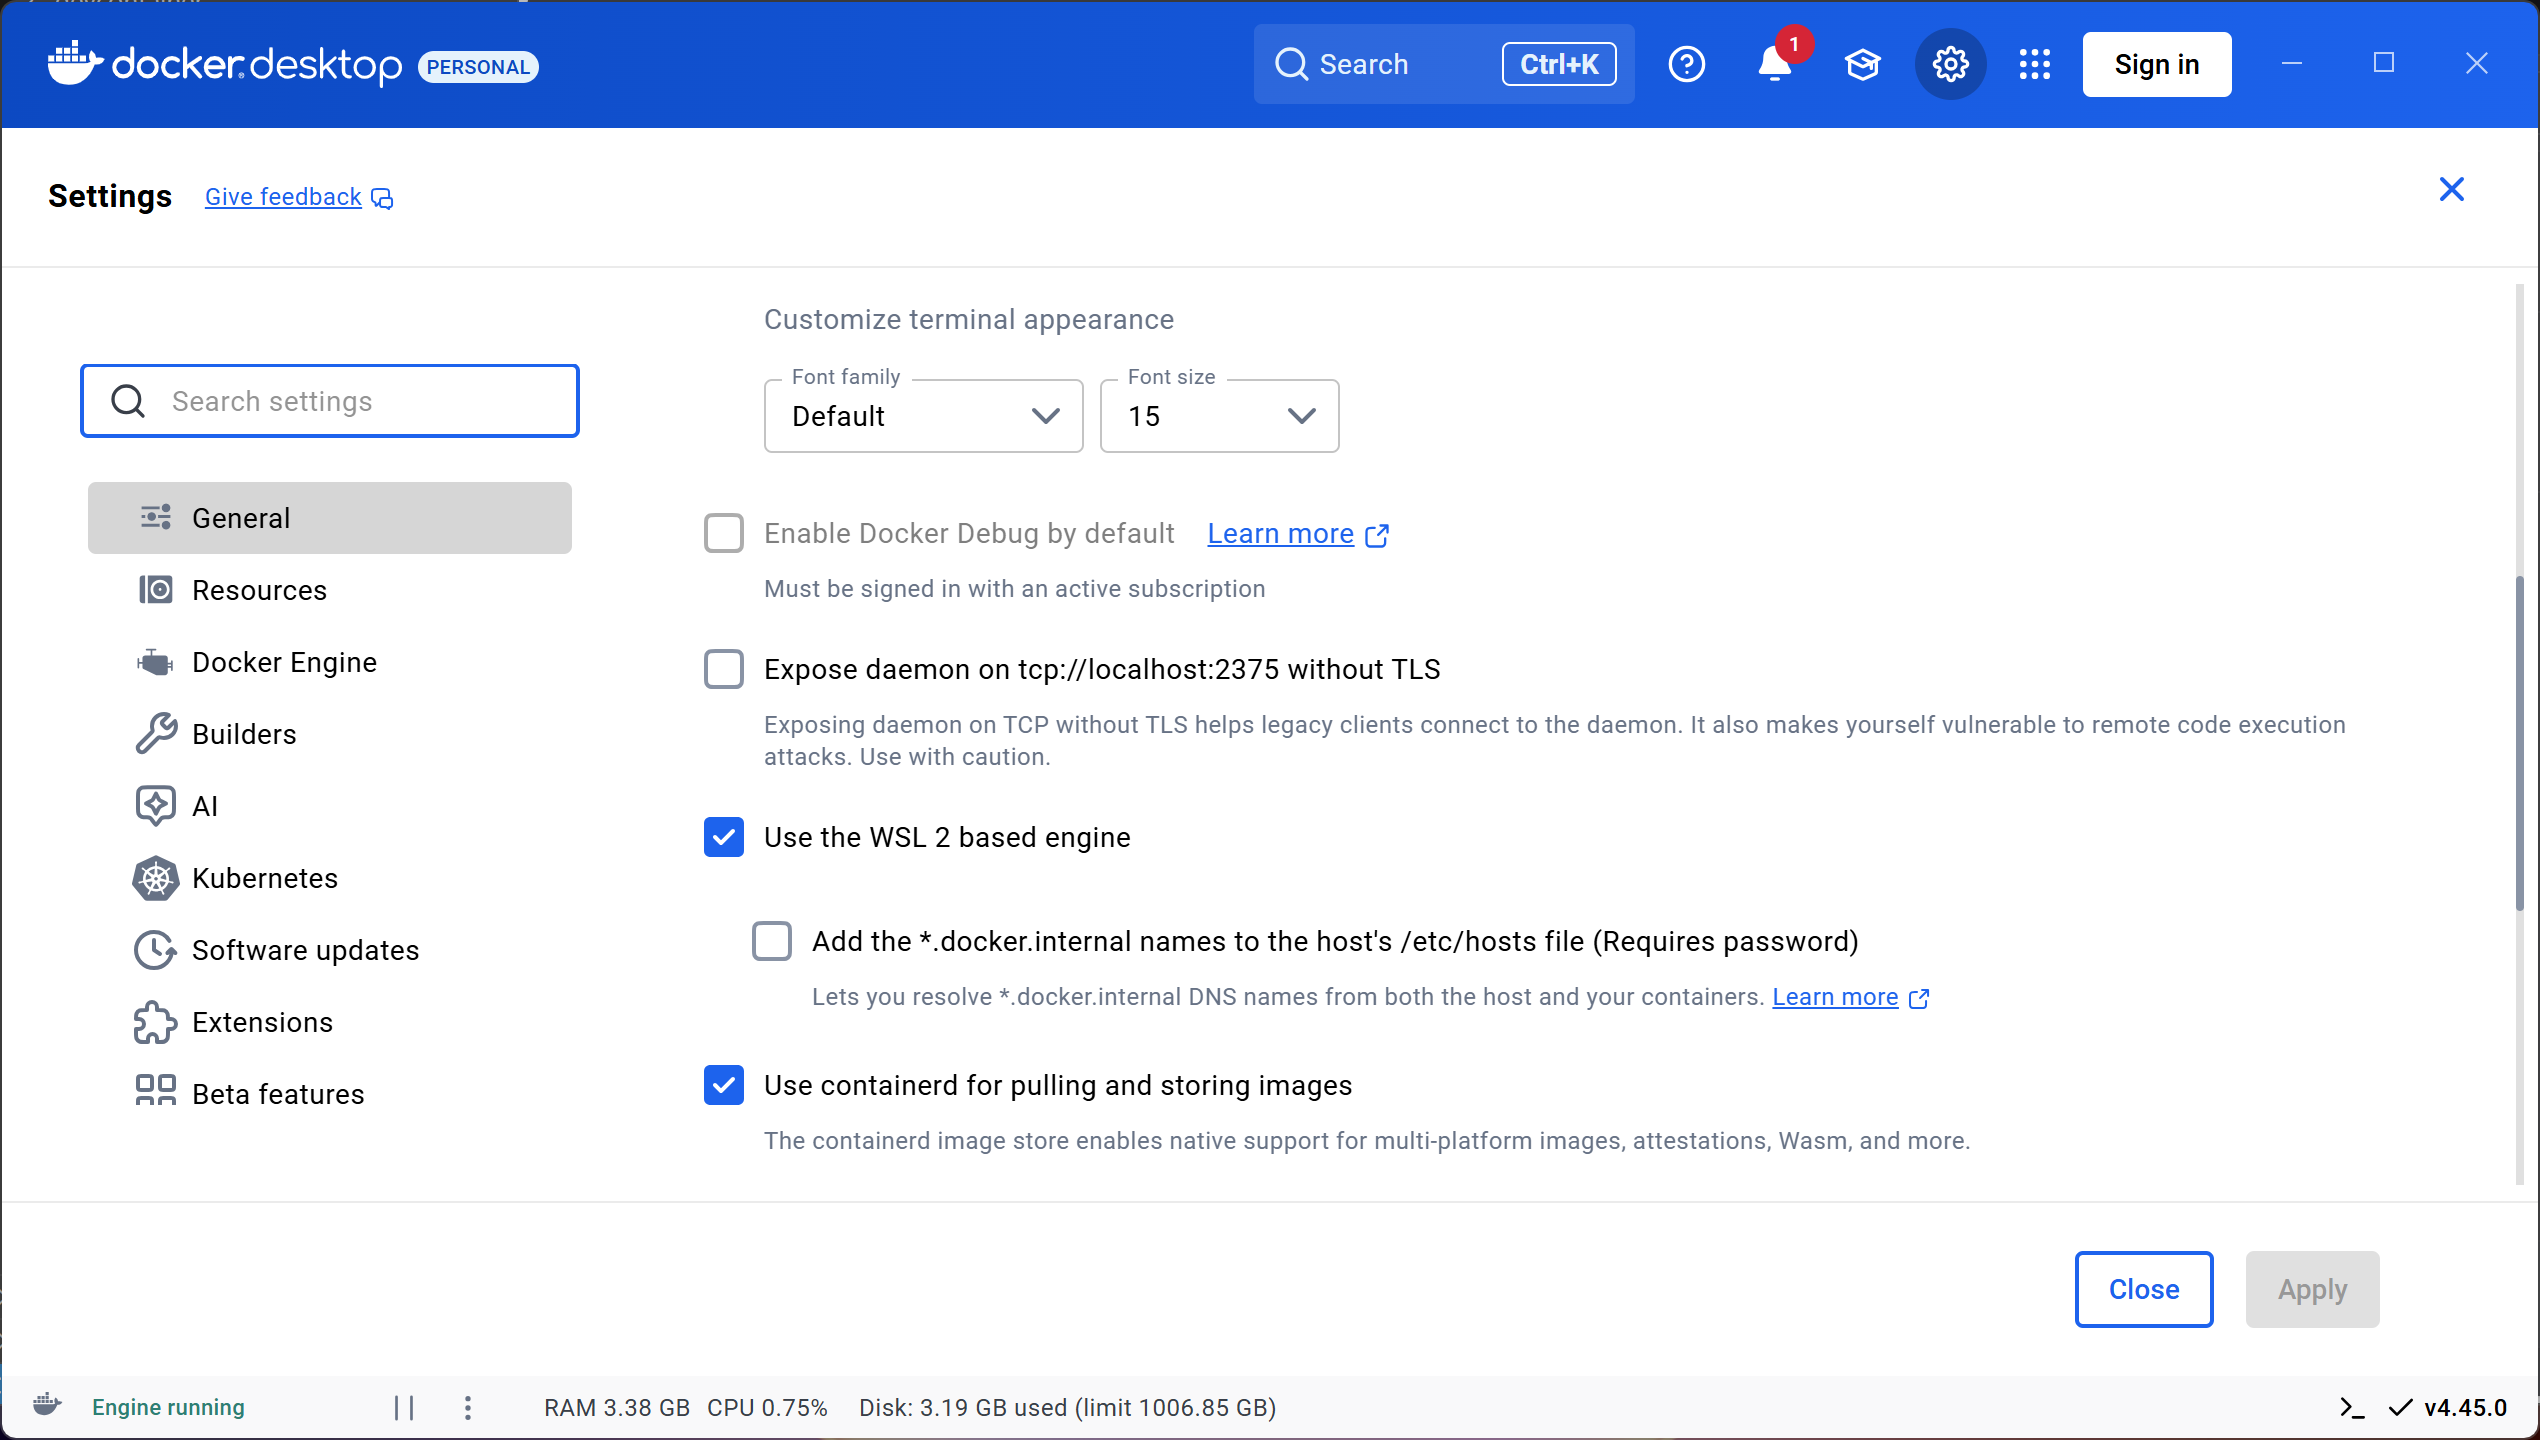
Open Docker Desktop and verify these settings (you can skip the account page if you'd like):
- Settings -> verify "Use the WSL 2 based engine" is checked.
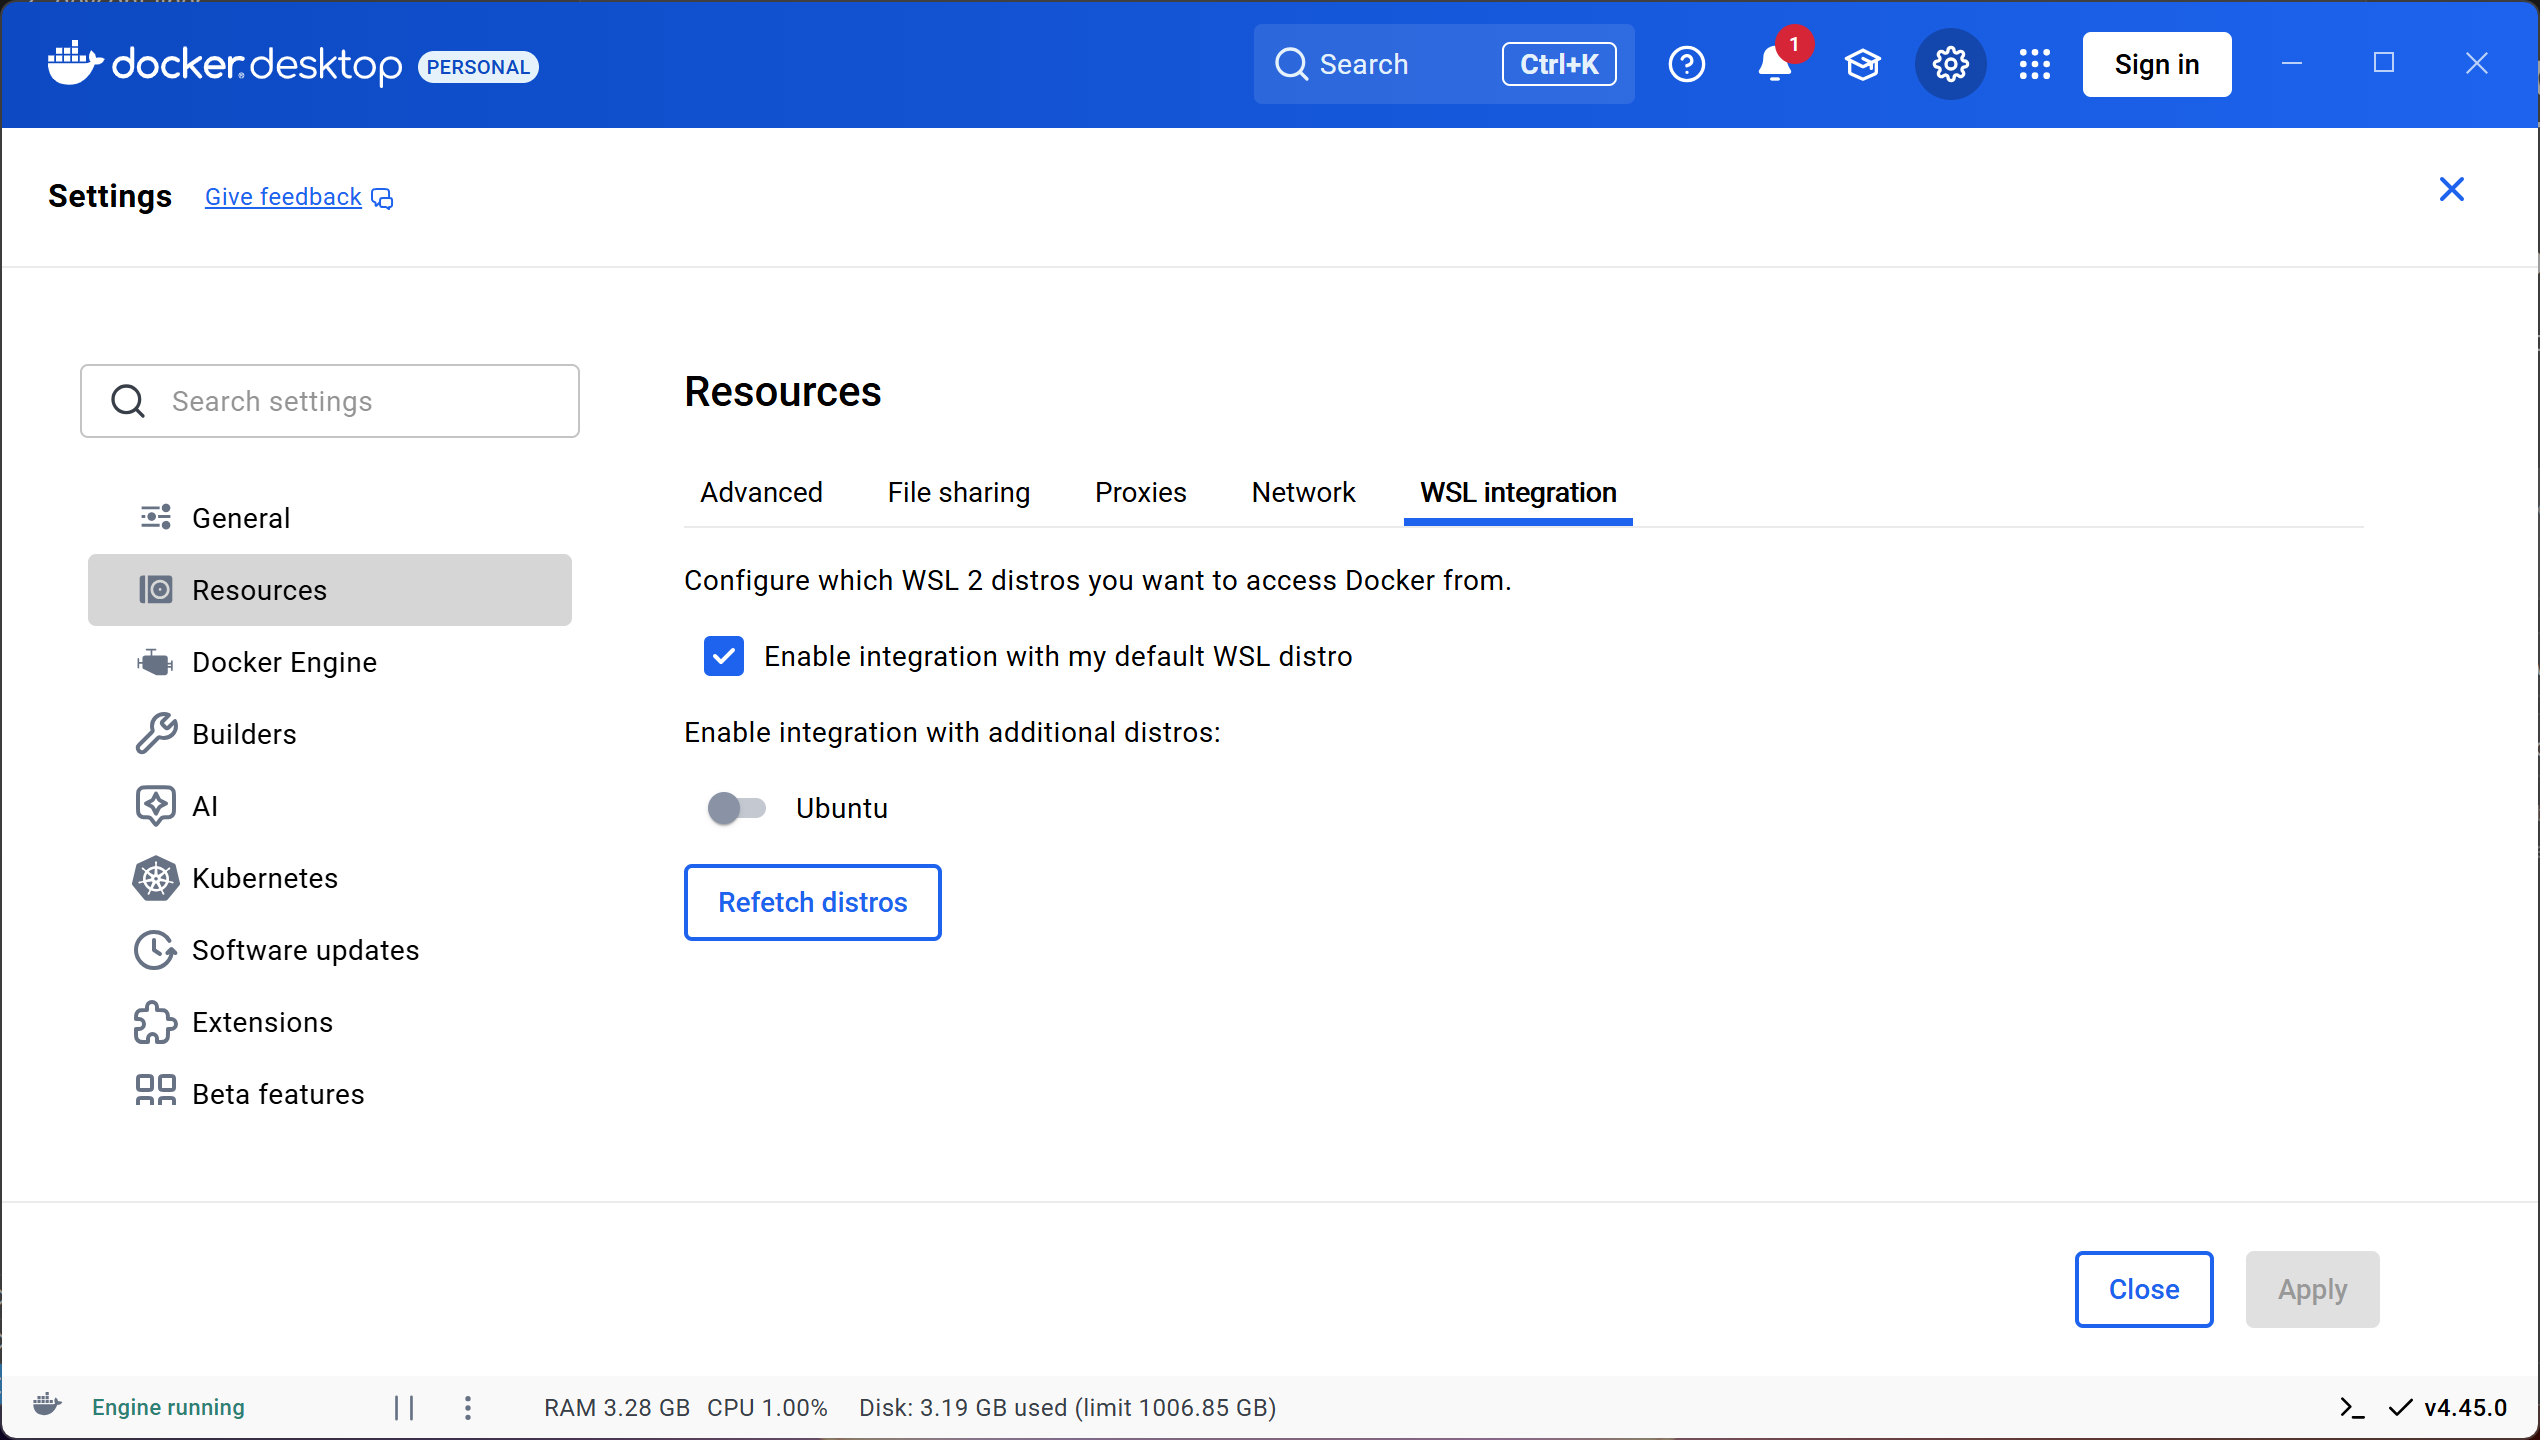
- Settings -> Resources -> WSL integration -> verify "Enable integration with my default WSL distro" is enabled.
Download and install Visual Studio Code.
Open Visual Studio Code, and navigate to the Extensions menu located at the bottom of the left hand side bar. Install these extensions:
git clone ukoOS (git clone https://github.com/UMN-Kernel-Object/ukoos), open the folder in Visual Studio Code, and follow any installation prompts that pop up.
It should prompt you to reopen in Dev Container, If not, press Ctrl + Shift + P and type 'Reopen in Dev Container`.
You are now in the ukoOS Dev Container.
To verify this, run the below command and verify the line NAME="Alpine Linux" is present.
cat /etc/os-release
Before you make any local changes, you must run git reset --hard.
NOTE: IF YOU HAVE ANY LOCAL CHANGES, THIS COMMAND WILL DISCARD THEM.
This allows you to run ./configure without issues.
How to sign off and commit changes (in VSCode):
Go to the "Source Control" tab in VSCode, and in the message box, write a description of what you've done.
Press the 3 dots icon shown below, go down to the commit menu, and select "Commit (Signed Off)."
When the pop-up "Would you like to stage all your changes and commit them directly" pops up, click yes. To push the changes, click "Sync Changes."
How to sign off and commit changes (in the CLI):
Your commits should look something like this:
git commit -s -m 'description of what you've done'
Troubleshooting
Linux
- If you are not using the dev container, and your distribution's
tftptimes out (error shown below), installbusybox, and try again. Then, runningbusybox tftpshould work. This is an issue we are having with Fedora's tftp package, and possibly more.
> tftp 192.168.2.91 -c put kernel.elf
Transfer timed out.
The error on the board/tftp server side:
uko-uboot# tftpsrv
Speed: 100, full duplex
Using ethernet@4070000 device
Listening for TFTP transfer on 169.254.96.84
Load address: 0x81800000
Loading: T T T T T T T T T T
Retry count exceeded; starting again
macOS
Currently no known issues.
Windows 11
- If you open ukoOS in the dev container, and you get this error:
/workspaces/ukoos # ./configure
env: ‘bash\r’: No such file or directory
env: use -[v]S to pass options in shebang lines
run git reset --hard.
NOTE THIS WILL ERASE ALL YOUR LOCAL CHANGES.
- If you get the error shown below, you will need to launch Docker Desktop, then try connecting to the dev container again.
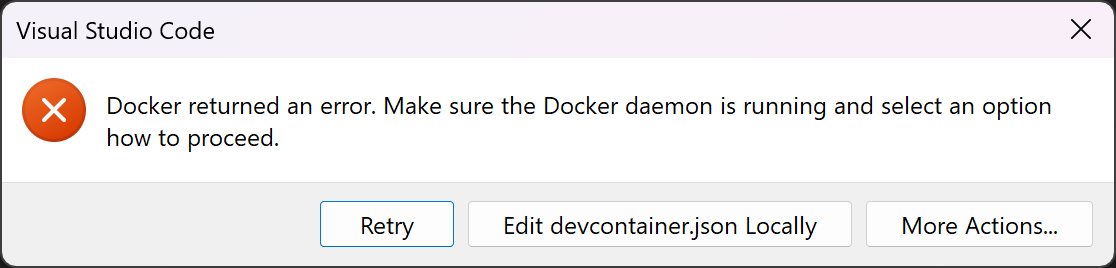
- If Docker Desktop does not open, you need to open Task Manager and end the "Docker Desktop Backend" task, shown below. (To end a task, click on it, then click "End task" on the top right.)

Dev Container
Currently no known issues.
GDB
GDB is a debugger that will allow us to debug the kernel under a virtual machine.
From the first terminal run qemu, but we need to add options to enable debugging
make qemu-debug
Which will be controlled by GDB once we start it here (from a new shell)
make gdb
Commands
Here are some useful commands, note that commands can be abbreviated so next can become n. There are many other commands so make sure to read the docs and help menus.
General Commands
| Command | Meaning |
|---|---|
| q | quit gdb |
| kill | kill debugged process (in our case ukoOS) |
| info r | list register values |
| file file | load symbols from file |
| tui enable | enable tui (to split screen source and gdb) |
| help cmd | help for cmd |
Running Commands
| Command | Meaning |
|---|---|
| n | next line |
| s | step (like next line, but enters function calls) |
| c | continue until next breakpoint (or end) |
| si | step instruction |
| ni | next instruction |
Breakpoints
| Command | Meaning |
|---|---|
| b | add breakpoint at current point |
| b symbol | add breakpoint to symbol (symbol is a function name, etc.) |
| en n | enable breakpoint n |
| dis n | disable breakpoint n |
| info b | list breakpoints |
Printing
The p command can do quite a lot:
| Command | Meaning |
|---|---|
| p *addr | print value at address addr |
| p expr | print out some c-like expression, e.g. p struct->name |
| p/s *addr | print c-string at addr |
Demo
These are from the first day docs.
The first terminal, running make qemu-debug will look like this
And the second, running make gdb
The print() and format() functions
The ukoOS kernel provides different printing functions than one may be used to from userspace C. They more closely resemble what's provided by Python or Rust, although they have some differences because they can't rely on runtime type information. (If we can get runtime type information in the future, it would absolutely make sense to use it here.)
These functions are:
char *format(const char *fmt, ...);
void print(const char *fmt, ...);
Both functions take the same arguments, the only difference is whether they print the string immediately or return it in a heap-allocated buffer.
TODO:
The first argument is a format string. This string is composed of chunks of literal characters, format directives, and curly brace escapes. We can see all three in a print call like:
void foo(bool b, u32 n) {
    print("f({bool}) = {{ 1, 2, {u32:#010x} }}", b, n);
}
In this call, the string breaks down as follows:
                            f({bool}) = {{1, 2, {u32:#010x}}}
               literal "f(" ┴┘└────┤└──┤└┤└────┤└─────────┤└┤
format directive without arguments ┘   │ │     │          │ │
                        literal ") = " ┘ │     │          │ │
                             escaped '{' ┘     │          │ │
                             literal "1, 2, "  ┘          │ │
                          format directive with arguments ┘ │
                                                escaped '}' ┘
Literal chunks are printed as-is, and curly brace escapes print as the characters they're escaping.
Format directives print content computed at print-time, typically content computed from the arguments to print or format.
Format directives are split into two parts; inside the curly braces, there's a type name and optional arguments, separated by a colon (:).
List of format directives
i8, i16, i32, i64, isize, u8, u16, u32, u64, usize
These directives expect the appropriate C type in the arguments to print or format.
These directives print numbers. They take a variety of arguments:
#: Prints the a marker for the base before the sign (0b,0o, or0x).0: Left-pads the number with0(after the sign) instead of with- a number: Left-pads the number until it is at least this length.
b,o,x: Prints the number in binary, octal, or hex.
paddr, uaddr, uptr
These directives expect the appropriate C type in the arguments to print or format.
These directives print the address or the address part of the pointer.
They act like usize, except they default to having arguments of #018x.
bool
This directive expects a C bool in the arguments to print or format.
It prints either true or false, corresponding to the value.
This directive does not take any arguments.
cstr
This directive expects a C const char * in the arguments to print or format.
It prints it as a null-terminated string. This directive does not take any arguments.
indent
This directive expects a C usize in the arguments to print or format.
It prints that number of space characters ( ).
This directive does not take any arguments.
va
This directive expects a C const char* and a C va_list in the arguments to print or format.
It prints the content that format would print if that format string and those arguments were passed to it.
This directive does not take any arguments.
Threads and Harts
In ukoOS, there are three related concepts that are important to keep separate.
- harts, or hardware threads. Colloquially, we might call these "cores" or "CPUs." This terminology comes from RISC-V, but the concept applies to any architecture.
- kthreads, or kernel threads. The kernel manages these automatically, and will create and destroy them at various times.
- uthreads, or user threads. These are the threads that userspace programmers talk about. They are created only in response to userspace syscalls.
Each of these notions of threads also has its own notion of "thread-locals." These are stored in various places.
- Hart-locals are pointed to by the
sscratchCSR, so we can get to them in trap handlers, regardless of whether the trap handler interrupted kernel-space or user-space execution. - Kernel and user thread-locals are pointed to by the
tpregister (x4).
Overview
ukoOS has multiple strategies for memory management, that manage memory at different levels.
-
The kernel has a standard memory allocator, accessed with the functions
allocandfree. These functions act similarly tomallocandfreein ordinary C.This is based on the design from Mimalloc: Free List Sharding in Action; read that if you want to understand the design.
The allocator that handles these requests is called the heap memory allocator.
-
The kernel keeps track of all of RAM, and hands out pages to be mapped into userspace processes and to be used by the heap memory allocator.
This allocator is a simple free list.
This allocator is currently not capable of allocating more than a single contiguous page, but could be extended to support this in the future. This allocator is called the physical memory allocator.
-
The kernel manages its own virtual memory, in the RAM region of the memory map.
This allocator is a pair of treaps, one for all VMAs sorted by address, and another for only free VMAs sorted by size. If you're not already familiar with treaps, there's a Julia Evans piece about them: Data structure: the treap!
The allocator that handles these requests is called the virtual memory allocator.
Each hart has its own root page table, since it can be running a different userspace process. However, the kernel's memory map is kept in sync between all harts.
Higher-half memory is only rarely mapped and unmapped, so relatively inefficient mechanisms (a full TLB shootdown) can be used to ensure all harts have the same view of it.
Memory map
ukoOS is a higher-half kernel (i.e., all the kernel's data is mapped to an address whose MSB is 1). Depending on how many bits of virtual address space the hardware supports, the kernel memory map is somewhat different.
Sv39 memory map
In Sv39, virtual addresses are 39 bits, and sign-extended to 64 bits.
| Start Address | End Address | Size | Description |
|---|---|---|---|
0x0000000000000000 | 0x0000003fffffffff | 256GiB | Userspace virtual memory |
0x0000004000000000 | 0xffffffbfffffffff | 16EiB - 512GiB | Illegal addresses in Sv39 |
0xffffffc000000000 | 0xffffffdfffffffff | 128GiB | Physical memory |
0xffffffe000000000 | 0xffffffffbfffffff | 127GiB | RAM |
0xffffffffc0000000 | 0xffffffffffffffff | 1GiB | Kernel |
-
The userspace memory map can be controlled from userspace, and does not have a fixed structure.
-
A large range of 64-bit addresses are illegal in Sv39, because there are not enough bits to represent them.
-
128GiB of physical memory is directly mapped. This should be enough to access any memory-mapped devices; devices that use more physical memory than this tend to support Sv48 or Sv57.
-
Up to 127GiB of RAM can be mapped. Past this point, no more memory can be used by the kernel. Machines with anywhere near this much memory support Sv48 or Sv57, so this isn't a limitation in practice.
Memory gets mapped here by the allocator as needed.
-
The kernel itself is mapped into a large contiguous region. There are a lot of smaller regions within this region, but they're outside the scope of this page.
Booting
Before ordinary driver code can run, the three main allocators in the mm subsystem (heap, physical, virtual) need to be initialized. This document describes that initialization.
Build-time
At build-time, we can request pages (as .bss or .data) that we're given before the kernel starts, saving us from having to implement allocation that early in boot.
We use this to allocate initial page tables and some initial heap and stack memory.
See src/kernel/arch/riscv64/generate_bootstub.py for the code that does this.
The initial page tables are generated ahead-of-time and compiled into the kernel binary, so that virtual memory works immediately, before any allocators are up. These page tables have entries for:
- The physical memory mapping.
- The entire mapping is made, using 1GiB pages.
- The initial heap segment.
- This is 4MiB, and gets mapped to the RAM area.
- The boothart's stack.
- This is 2MiB, and gets mapped to the RAM area.
- After the physical memory allocator is set up, guard pages get set up.
- The kernel.
Heap allocator
There is one instance of the heap allocator per hart, to avoid the need to acquire locks or use atomics in the fast-path of allocation. The boothart's heap allocator gets initialized with the initial heap segment allocated at build-time. This lets the boothart allocate up to 4MiB of objects whose sizes are less than 512KiB.
One annoying thing -- the heap allocator depends on a source of entropy. This early in boot, the entropy pool cannot be fully seeded, so we have to try to harvest a bit of entropy to use. Right now, our only source of entropy at this point is the cycle and time counters. We take a trap while moving to the higher half, so we can get some unpredictability from the timings there; when booting on real hardware, the time taken to load the kernel from storage should also provide some.
The Devicetree gets parsed into memory owned by the heap allocator, which lets us add memory reservations for e.g. the kernel itself.
Physical allocator
Once the heap allocator is initialized on the boothart, we can discover the rest of the RAM. We do this by parsing the Devicetree that was passed to us by the bootloader.
Once it's parsed, we can easily extract the parts of it we need:
- The
/chosen/rng-seednode, as entropy to further initialize the entropy pool. This is usually enough to fully initialize the pool. /memorynodes, which describe the memory installed on the device./reserved-memorynodes, which we avoid adding to the physical allocator.
From the memory and reservations, we can find all the free regions of unreserved RAM. We use a simple free list to track them.
Virtual allocator
The virtual allocator for higher-half memory can now be initialized as well. This allocator covers the entire 38-bit space, but will only ever have the RAM area marked as free.
Once this is done, the heap allocator is able to allocate more heap segments from the physical allocator, so there's no longer a 4MiB limitation on heap allocation.
Targets
Because different hardware platforms have different requirements, ukoOS supports them as different targets.
Milk-V Duo S (milkv-duos)
The Milk-V Duo S is the board we're targetting this year (academic year 2025). This board uses the Sophgo SG2000 SoC, which uses the T-Head C906 CPU. The board has 512MiB of RAM and a 1GHz CPU.
The hardware kits for this year also include:
- a 480x320 touchscreen
- a 32GiB microSD card
- a USB UART, which allows connecting to the board's serial port
- jumper wires, to connect the touchscreen to the board
Milk-V Jupiter (milkv-jupiter)
Some members also own devices based on the SpacemiT K1 SoC, which uses the SpacemiT X60 CPU. This SoC has 8 CPU cores that run at 1.6GHz.
One such device is the Milk-V Jupiter. This board can have the K1, or the closely related SpacemiT M1 SoC (which runs at 2GHz, but otherwise does not significantly differ). This board can come with between 4GiB and 16GiB of RAM.
We probably won't focus on developing drivers for this system this year, but it might make an attractive target for the future. It is worth ensuring that the kernel doesn't do anything that breaks this board; it's far more standards-compliant than the Duo S, and future devices we use will hopefully be a lot closer to it.
QEMU RISC-V (qemu-riscv64)
The QEMU-based emulator is its own target. This uses an RVA22 CPU on the virt machine, with an RTL8139 NIC.
Tutorials
Here there are a series of tutorials that will guide the reader through building and modifying ukoOS.
First Day
The First Day tutorial will start from nothing and end with fixing a bug in operating system. It will walk through installing the tools (using docker), downloading code, setting up and building the operating system, and finally running and testing.
First Day
Setting Up
Start by setting up a dev container for Linux, MacOS, Windows. You will need VSCode and Docker to use the provided devcontainer (in the git repo).
Troubleshooting
If there are any issues, check out the troubleshooting guide and ask us questions.
Checkout code
The kernel is hosted on GitHub so if you haven't already downloaded the code, here is how:
git clone https://github.com/UMN-Kernel-Object/ukoos.git
cd ukoos
Compiling
Once we have the code and tools, we can compile the code from the dev container
mkdir build
cd build
../configure --target qemu-riscv64
make
Running
Once the kernel is built, we can run the code inside a virtual machine (qemu)
make qemu
Debugging
From the first terminal run qemu, but we need to add options to enable debugging
make qemu-debug
Which will be controlled by GDB once we start it here (from a new shell)
make gdb
The first terminal, running make qemu-debug will look similar to the video below. However, it won't do anything until you run make gdb in the second window.
And the second, running make gdb
The gdb window will be how you will control the OS (with the controls below) but the output will show up in the first. There is a more detailed guide on using gdb, but here are the basics:
| Command | Meaning |
|---|---|
| n | next line |
| s | step (like next line, but enters function calls) |
| c | continue until next breakpoint (or end) |
| b | add breakpoint at current point |
| b symbol | add breakpoint to symbol (symbol is a function name, etc.) |
| p variable | print the value of the C variable |
Fixing a bug
Checking out the first day code
Switch to the tutorial code
git checkout tutorials/first-day
Please note, do not run the ./configure script from the tutorials/first-day branch, it will make the following commands not work.
and rebuild
cd build
make
Once you have the code and are able to run and debug, you'll notice that "Hello, World!" is misspelled! Try using the debugger to step through and find the line that prints this out incorrectly, then go to the file, edit it, and re-run.
Set Up
Connect to the board via an Ethernet cable. Connect to the board via serial. To do this, plug in the included USB UART adapter to your host system, and then plug in the UART cables to the board as described below. If you do not plug in to the right pins, you run the risk of frying the board, so please follow these instructions carefully!
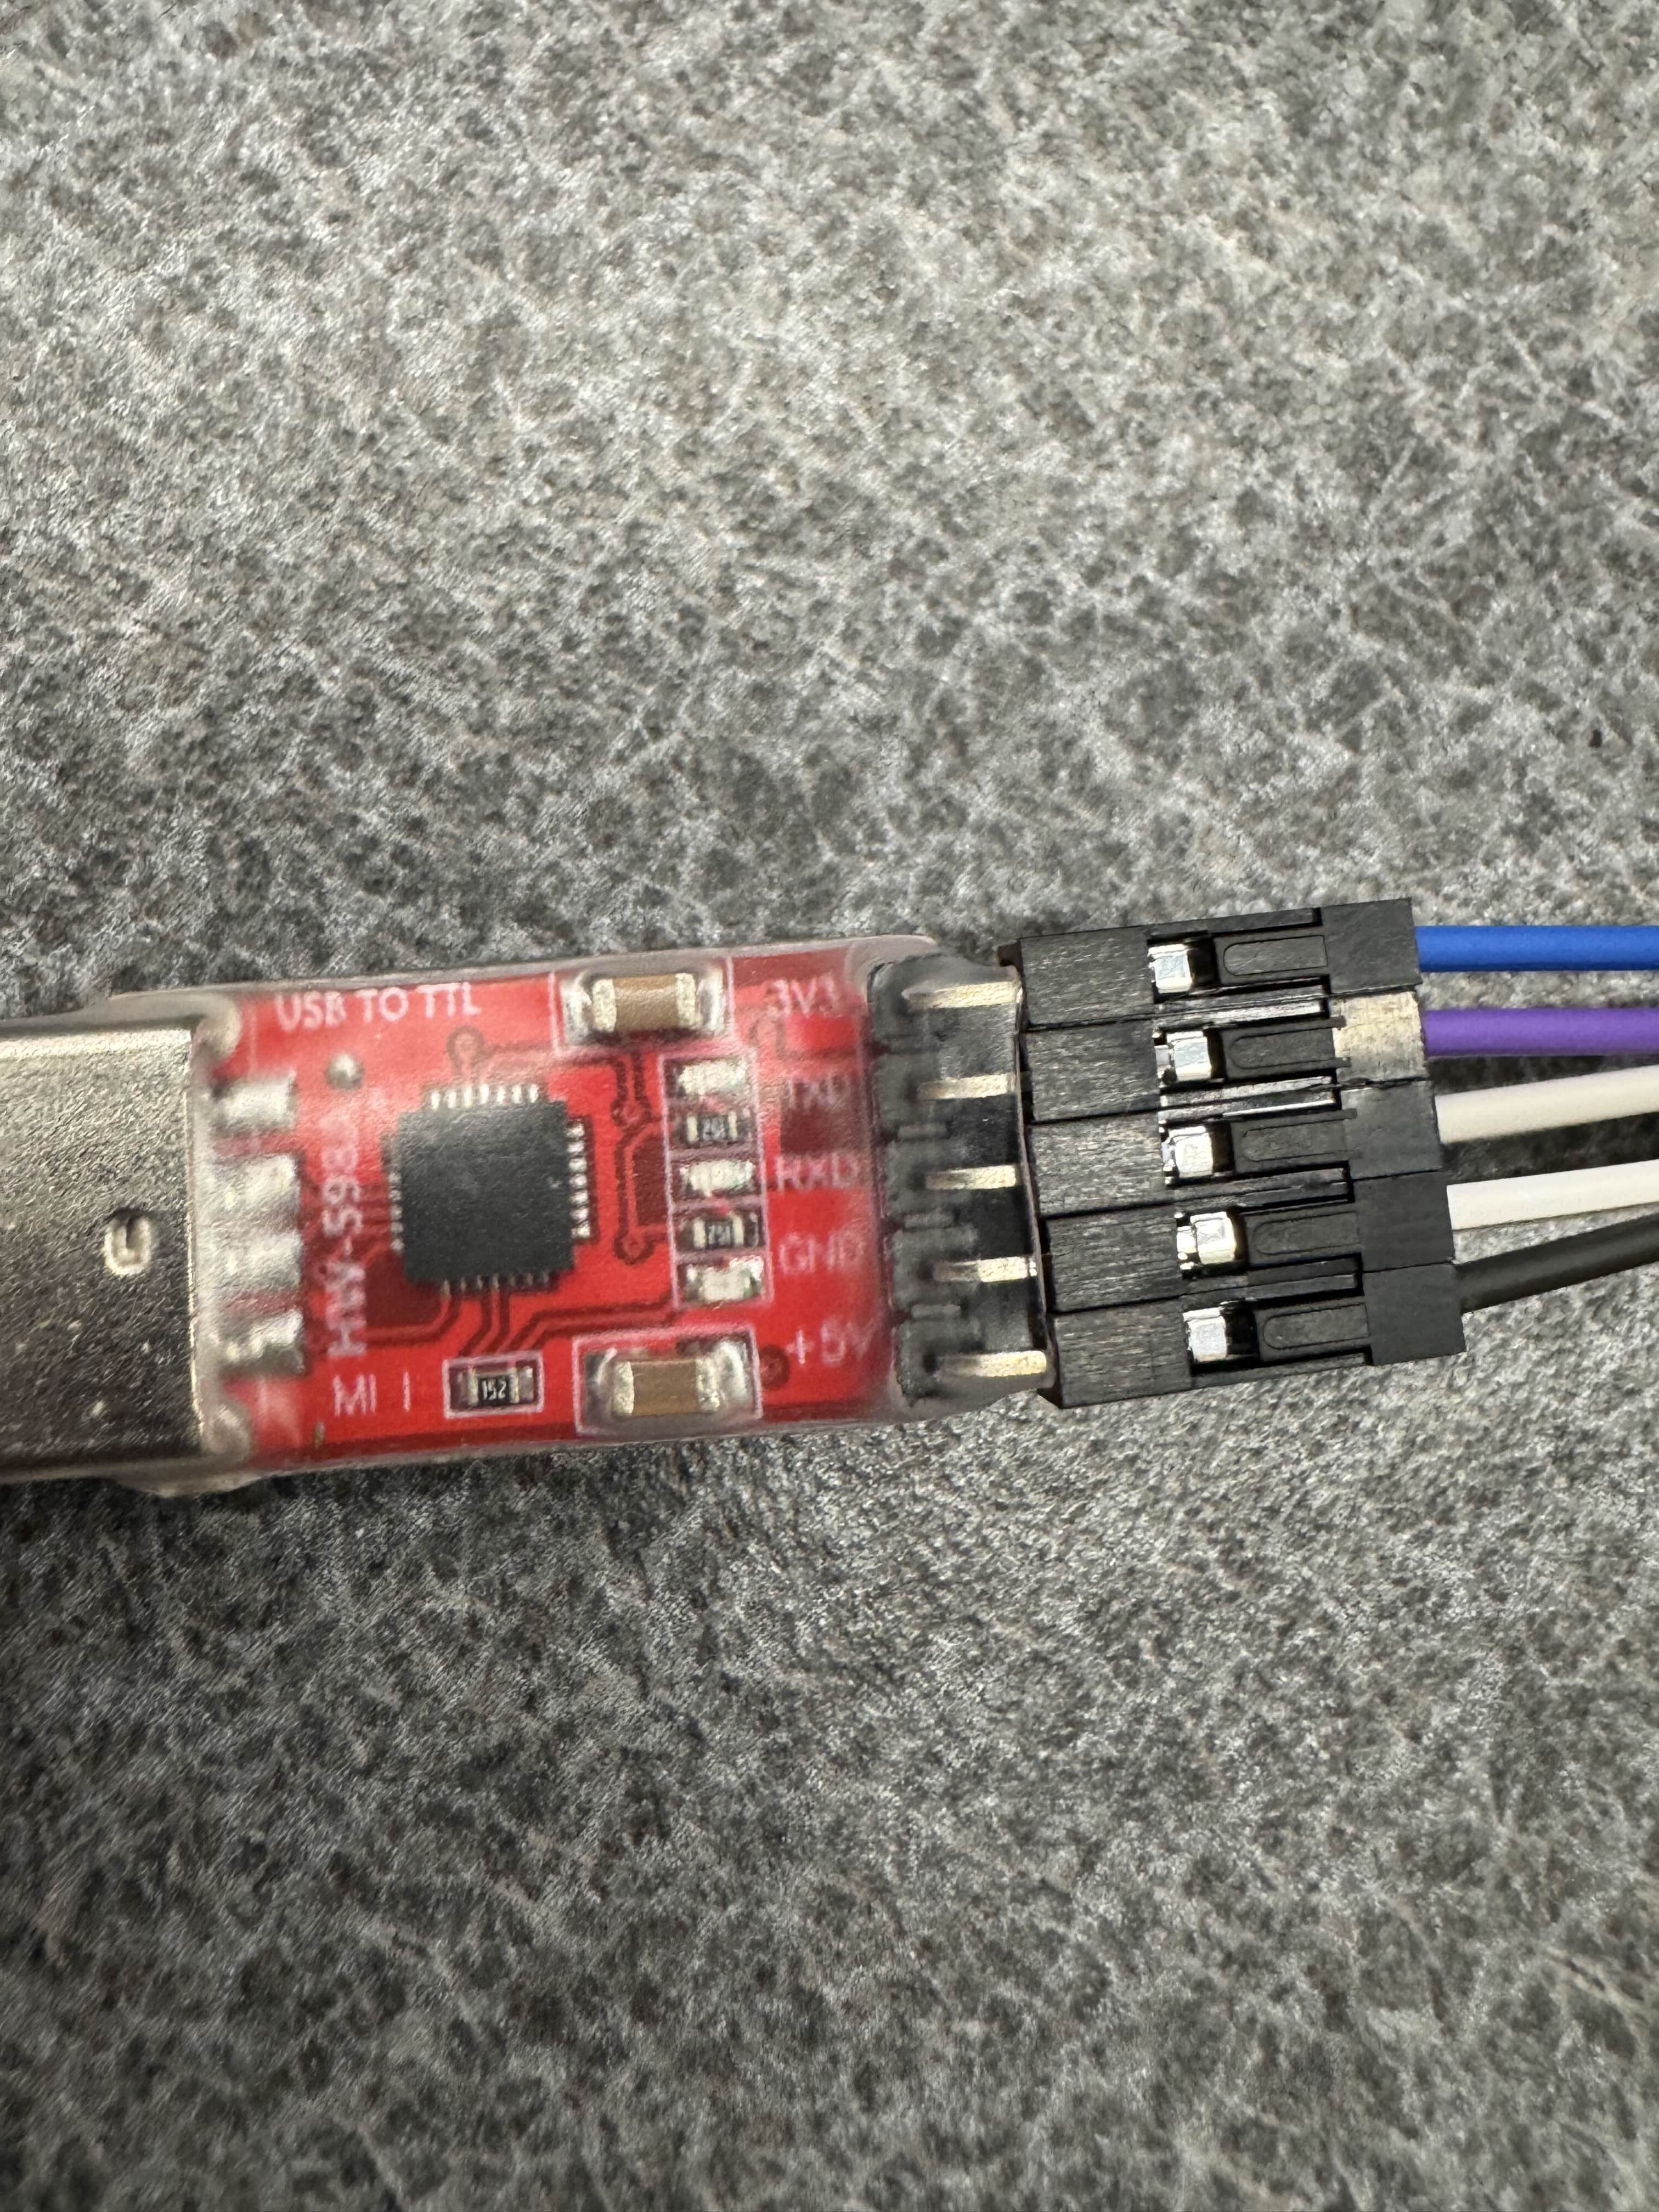
You will want to locate the pin on the UART board labeled +5V, above that will be GND, RXD, and TXD (shown below).
We will not be using the 3V3 pin (some of the boards have a cable coming out of 3V3, ignore it).
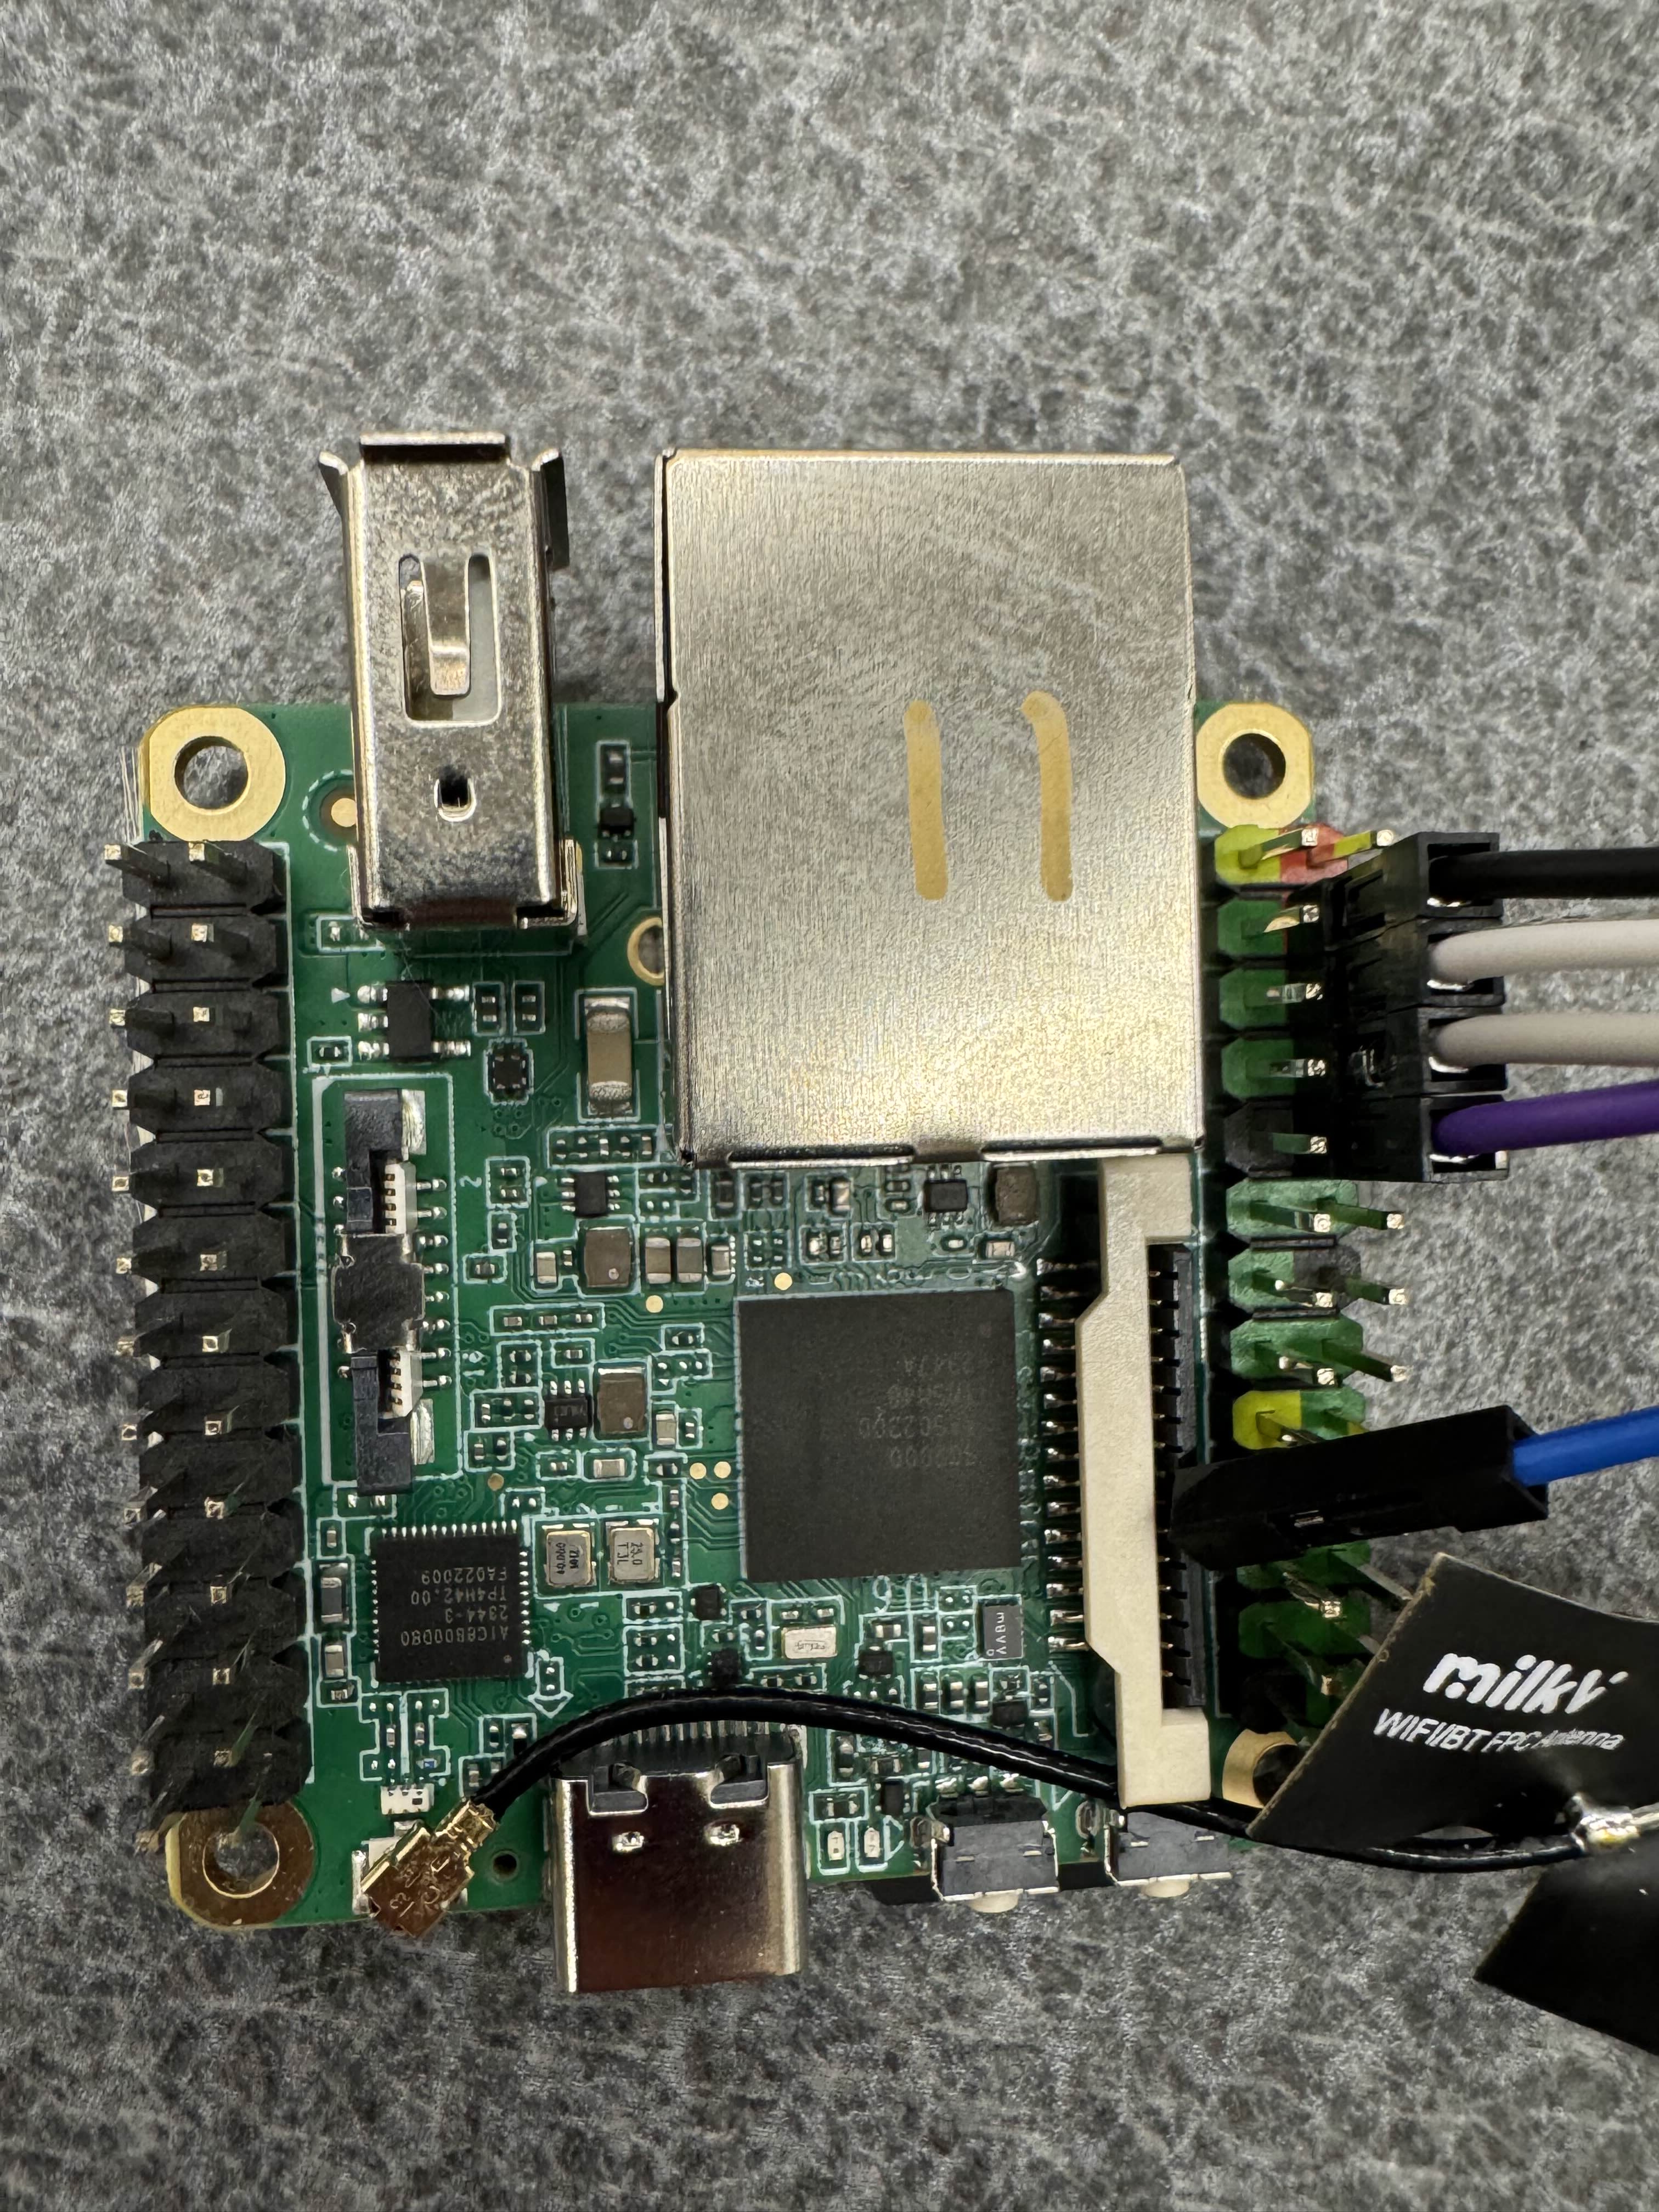
The +5V cable will be attached to the second to top pin on the right side of the board, on the column of pins on the outward side, as shown below (black cable).
The GND, RXD, and TXD will then be plugged into the board below the +5V, in order of how they are listed on the UART board, as shown below.
NOTE - Your cable colors may be different.
Once you have these connected, you will need to connect to the board over serial. We will describe how to connect to this via the dev container below.
Accessing the board via serial through the dev container (We are assuming you are using Linux)
Before entering the dev container, you must add yourself to the correct group in order to pass the USB device through to the container.
Most distributions use the dialout group.
This includes Ubuntu, NixOS, and Debian.
You can check what your distro uses with ls -g /dev/ttyUSB0.
This will print something like crw-rw---- 1 dialout 188, 0 Oct 30 21:35 /dev/ttyUSB0.
If another word is there instead of dialout, that is the group you should use for the rest of the instructions.
If the group is root, ask an officer -- you probably need to do something different.
Run the following command outside of the dev container:
sudo usermod -aG dialout ${USER}
Note, you may need to log out and log back in for this to take full effect.
Then, via the dev container, run the following command (this should be your serial device, unless you have another serial device already connected):
sudo minicom -D /dev/ttyUSB0
Note, to exit the board, press Ctrl + A, then enter q, then press Enter.
The board should boot into U-Boot, and start its TFTP server by default.
Now, connect an Ethernet cable from the board to your laptop. Reboot the board if the board is stuck or already booted in to a kernel. If the board did boot into a kernel, spam the down arrow on your laptop in the serial console while the board is rebooting and select the network boot option in the menu once it appears. Wait for the board to give up on connecting via BOOTP and take note of the link-local address it prints.
To send files to the board over TFTP, you first need to assign your host device an IP address (if you are on macOS or Windows, no extra work should be required for this to work, you should already have a working link-local connection). If you are on Linux, follow the below steps:
Open your network settings, go into the Ethernet connection, and create a new connection, as shown below.
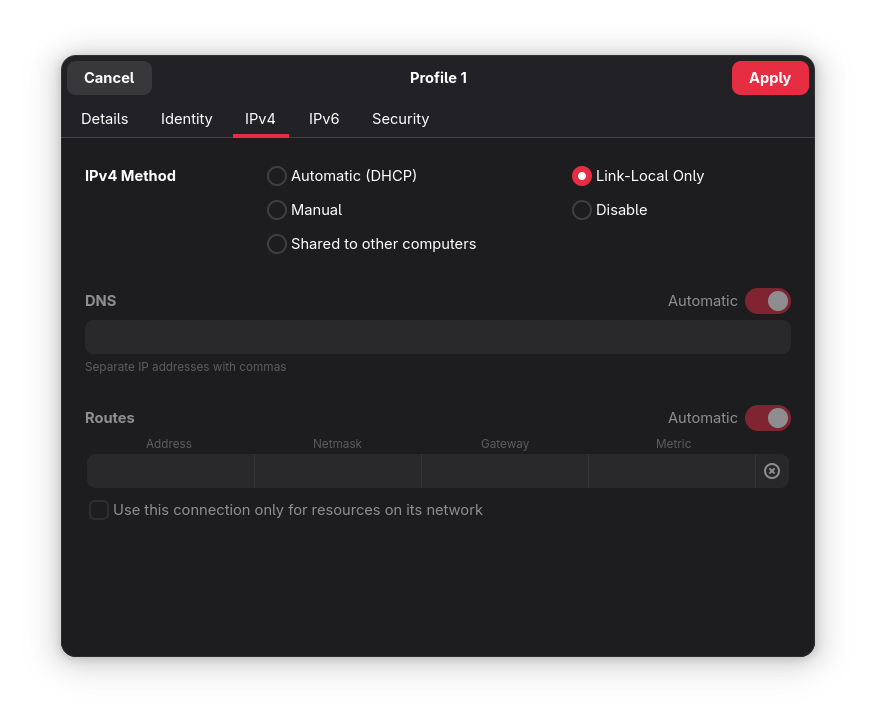
Make sure to set the mode of the network interface to Link-Local.
You can now send the kernel over TFTP with the following command:
busybox tftp -p -l <path to built kernel.elf> <board's link-local IP>
Troubleshooting
- Verify that you HAVE 5v connected and do NOT have 3.3v connected
- 5v pin cable lines up with second red, the rest of the pin cables connect going down, in order
- Button closest to edge reboots the board
- Verify your Ethernet cable is fully functional
- Make sure the dev container is up to date